Advertisement

Tuesday, 16 June 2020

How to deploy new azure vm through ARM templates

 
Please make ready below 2 template.json file and parameters.json file. after that logn to azure powershell and give below command to create VM.

Powershell command: 

New-AzureRmResourceGroupDeployment -Name testdeployment -ResourceGroupName RGtest1 -TemplateFile "C:\temp\Azure scripts\template.json" -TemplateParameterFile "C:\temp\Azure scripts\parameters.json"


Templates file : copy and save it as template.json file and modify your requirements.

{
    "$schema": "http://schema.management.azure.com/schemas/2015-01-01/deploymentTemplate.json#",
    "contentVersion": "1.0.0.0",
    "parameters": {
        "location": {
            "type": "string"
        },
        "networkInterfaceName": {
            "type": "string"
        },
        "networkSecurityGroupName": {
            "type": "string"
        },
        "networkSecurityGroupRules": {
            "type": "array"
        },
        "subnetName": {
            "type": "string"
        },
        "virtualNetworkId": {
            "type": "string"
        },
        "publicIpAddressName": {
            "type": "string"
        },
        "publicIpAddressType": {
            "type": "string"
        },
        "publicIpAddressSku": {
            "type": "string"
        },
        "virtualMachineName": {
            "type": "string"
        },
        "virtualMachineComputerName": {
            "type": "string"
        },
        "virtualMachineRG": {
            "type": "string"
        },
        "osDiskType": {
            "type": "string"
        },
        "virtualMachineSize": {
            "type": "string"
        },
        "adminUsername": {
            "type": "string"
        },
        "adminPassword": {
            "type": "secureString"
        },
        "diagnosticsStorageAccountName": {
            "type": "string"
        },
        "diagnosticsStorageAccountId": {
            "type": "string"
        },
        "diagnosticsStorageAccountType": {
            "type": "string"
        },
        "diagnosticsStorageAccountKind": {
            "type": "string"
        }
    },
    "variables": {
        "nsgId": "[resourceId(resourceGroup().name, 'Microsoft.Network/networkSecurityGroups', parameters('networkSecurityGroupName'))]",
        "vnetId": "[parameters('virtualNetworkId')]",
        "subnetRef": "[concat(variables('vnetId'), '/subnets/', parameters('subnetName'))]"
    },
    "resources": [
        {
            "name": "[parameters('networkInterfaceName')]",
            "type": "Microsoft.Network/networkInterfaces",
            "apiVersion": "2019-07-01",
            "location": "[parameters('location')]",
            "dependsOn": [
                "[concat('Microsoft.Network/networkSecurityGroups/', parameters('networkSecurityGroupName'))]",
                "[concat('Microsoft.Network/publicIpAddresses/', parameters('publicIpAddressName'))]"
            ],
            "properties": {
                "ipConfigurations": [
                    {
                        "name": "ipconfig1",
                        "properties": {
                            "subnet": {
                                "id": "[variables('subnetRef')]"
                            },
                            "privateIPAllocationMethod": "Dynamic",
                            "publicIpAddress": {
                                "id": "[resourceId(resourceGroup().name, 'Microsoft.Network/publicIpAddresses', parameters('publicIpAddressName'))]"
                            }
                        }
                    }
                ],
                "networkSecurityGroup": {
                    "id": "[variables('nsgId')]"
                }
            }
        },
        {
            "name": "[parameters('networkSecurityGroupName')]",
            "type": "Microsoft.Network/networkSecurityGroups",
            "apiVersion": "2019-02-01",
            "location": "[parameters('location')]",
            "properties": {
                "securityRules": "[parameters('networkSecurityGroupRules')]"
            }
        },
        {
            "name": "[parameters('publicIpAddressName')]",
            "type": "Microsoft.Network/publicIpAddresses",
            "apiVersion": "2019-02-01",
            "location": "[parameters('location')]",
            "properties": {
                "publicIpAllocationMethod": "[parameters('publicIpAddressType')]"
            },
            "sku": {
                "name": "[parameters('publicIpAddressSku')]"
            }
        },
        {
            "name": "[parameters('virtualMachineName')]",
            "type": "Microsoft.Compute/virtualMachines",
            "apiVersion": "2019-07-01",
            "location": "[parameters('location')]",
            "dependsOn": [
                "[concat('Microsoft.Network/networkInterfaces/', parameters('networkInterfaceName'))]",
                "[concat('Microsoft.Storage/storageAccounts/', parameters('diagnosticsStorageAccountName'))]"
            ],
            "properties": {
                "hardwareProfile": {
                    "vmSize": "[parameters('virtualMachineSize')]"
                },
                "storageProfile": {
                    "osDisk": {
                        "createOption": "fromImage",
                        "managedDisk": {
                            "storageAccountType": "[parameters('osDiskType')]"
                        }
                    },
                    "imageReference": {
                        "publisher": "MicrosoftWindowsServer",
                        "offer": "WindowsServer",
                        "sku": "2016-Datacenter",
                        "version": "latest"
                    }
                },
                "networkProfile": {
                    "networkInterfaces": [
                        {
                            "id": "[resourceId('Microsoft.Network/networkInterfaces', parameters('networkInterfaceName'))]"
                        }
                    ]
                },
                "osProfile": {
                    "computerName": "[parameters('virtualMachineComputerName')]",
                    "adminUsername": "[parameters('adminUsername')]",
                    "adminPassword": "[parameters('adminPassword')]",
                    "windowsConfiguration": {
                        "enableAutomaticUpdates": true,
                        "provisionVmAgent": true
                    }
                },
                "diagnosticsProfile": {
                    "bootDiagnostics": {
                        "enabled": true,
                        "storageUri": "[concat('https://', parameters('diagnosticsStorageAccountName'), '.blob.core.windows.net/')]"
                    }
                }
            }
        },
        {
            "name": "[parameters('diagnosticsStorageAccountName')]",
            "type": "Microsoft.Storage/storageAccounts",
            "apiVersion": "2019-06-01",
            "location": "[parameters('location')]",
            "properties": {},
            "kind": "[parameters('diagnosticsStorageAccountKind')]",
            "sku": {
                "name": "[parameters('diagnosticsStorageAccountType')]"
            }
        }
    ],
    "outputs": {
        "adminUsername": {
            "type": "string",
            "value": "[parameters('adminUsername')]"
        }
    }
}


Parameters file: copy and save this as parameters.json file and modify as per your requirement.


{
    "$schema": "https://schema.management.azure.com/schemas/2015-01-01/deploymentParameters.json#",
    "contentVersion": "1.0.0.0",
    "parameters": {
        "location": {
            "value": "centralus"
        },
        "networkInterfaceName": {
            "value": "testvm1885"
        },
        "networkSecurityGroupName": {
            "value": "testvm1-nsg"
        },
        "networkSecurityGroupRules": {
            "value": [
                {
                    "name": "RDP",
                    "properties": {
                        "priority": 300,
                        "protocol": "TCP",
                        "access": "Allow",
                        "direction": "Inbound",
                        "sourceAddressPrefix": "*",
                        "sourcePortRange": "*",
                        "destinationAddressPrefix": "*",
                        "destinationPortRange": "3389"
                    }
                }
            ]
        },
        "subnetName": {
            "value": "default"
        },
        "virtualNetworkId": {
            "value": "/subscriptions/d2a5d588-68f2-4544-8331-9eaa876b87e4/resourceGroups/Rgtest1/providers/Microsoft.Network/virtualNetworks/vnet1"
        },
        "publicIpAddressName": {
            "value": "testvm1-ip"
        },
        "publicIpAddressType": {
            "value": "Dynamic"
        },
        "publicIpAddressSku": {
            "value": "Basic"
        },
        "virtualMachineName": {
            "value": "testvm1"
        },
        "virtualMachineComputerName": {
            "value": "testvm1"
        },
        "virtualMachineRG": {
            "value": "Rgtest1"
        },
        "osDiskType": {
            "value": "Standard_LRS"
        },
        "virtualMachineSize": {
            "value": "Standard_DS1_v2"
        },
        "adminUsername": {
            "value": "adminuser"
        },
        "adminPassword": {
            "value": null
        },
        "diagnosticsStorageAccountName": {
            "value": "rgtest1diag928"
        },
        "diagnosticsStorageAccountId": {
            "value": "Microsoft.Storage/storageAccounts/rgtest1diag928"
        },
        "diagnosticsStorageAccountType": {
            "value": "Standard_LRS"
        },
        "diagnosticsStorageAccountKind": {
            "value": "Storage"
        }
    }
}

Thursday, 23 April 2020

Azure Accelerated Networking and How to Enable it


How to Enable Accelerated Networking:

You can enable this feature during initial creation of the VM, on the networking tab, you will see “Enable Accelerated Networking”. If you are unable to enable, then it is not compatible on your chosen Azure VM size. If you need to enable this feature after VM creation you will require to do so through powershell as it is not yet supported in the portal. You can do this simply with the below commands after deallocating the Virtual Machine.

 1. Power off and de allocate VM.
 2. Open powershell in any internet connected machine with Azure modules installed.
 3. Login-AzureRmAccount
 4. $nic = Get-AzureRmNetworkInterface -ResourceGroupName “YourResourceGroupName” -Name “YourNicName”
 5. $nic.EnableAcceleratedNetworking = $true
 6. $nic | Set-AzureRmNetworkInterface
 7. Then proceed to start the Virtual Machine and Accelerated Networking will be enabled.


What is Azure Accelerated Networking?

Azure Accelerated Networking is a new option for Azure Infrastructure as a Service (IaaS) Virtual Machine (VM) on the NIC level providing several benefits by enabling single root I/O virtualization (SR-IOV) to a VM, greatly improving its networking performance. This high-performance path bypasses the host from the datapath, reducing latency, jitter, and CPU utilization, for use with the most demanding network workloads on supported VM types. You would typically use this feature with heavy workloads that need to send or receive data at high speed with reliable streaming and lower CPU utilization. It will enable speeds of up to 25Gbps per Virtual Machine. Best of all, it’s free!


What are the Key Benefits?

Lower latency/Higher Packets per Second: Removing the virtual switch from the datapath removes the time packets spend in the host for policy processing and increases the number of packets that can be processed inside the VM, enabling more data to be pushed at once.
Reduced Jitter: Virtual switch processing depends on the amount of policy that needs to be applied and the workload of the CPU that is doing the processing. Offloading the policy enforcement to the hardware removes that variability by delivering packets directly to the VM, removing the host to VM communication and all software interrupts and context switches, which is better for streaming data.
Decreased CPU Utilization: Bypassing the virtual switch in the host leads to less CPU utilization for processing network traffic, leaving more capacity for processing large amounts of data being sent or received.
Requirements:
It is currently available in all regions under most general purpose VM sizes that have 2 or more vCPUs. It is also available for most hyperthreading VMs with 4 or more vCPUs.
This feature can be enabled on VM creation or on an existing VM meeting criteria in the stopped state.

Thursday, 3 January 2019

Windows Admin Password reset methods with disk attached


 Reset Windows Server 2012 Admin Password with Command Prompt

Command Prompt is truly an excellent command line interpreter which can be used to interpret various tasks at the cost of certain code lines in short span of time. Here we would implement cmd to remove the forgotten password. Read the steps carefully to perform the method:
Step 1. Firstly, create a bootable disk using CD/DVD or USB and insert it into the locked computer.
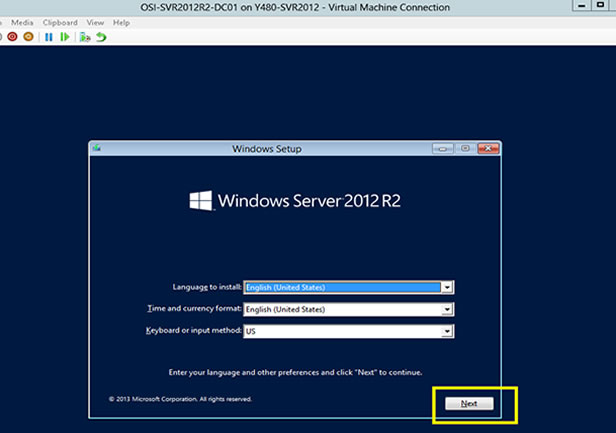
Reset Windows Server 2012
Step 2. Choose your language and click on "Troubleshoot" option.
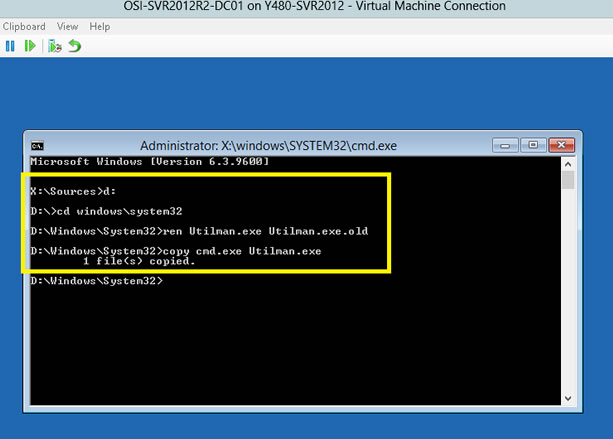
Step 3. Click on "Command Prompt" button to start it on an advanced mode and type the command scribbled below when the black dialog box turns up:
d: cd windows\system32: move Utilman.exe Utilman.exe.old
                                              : copy cmd.exe Utilman.exe
type command
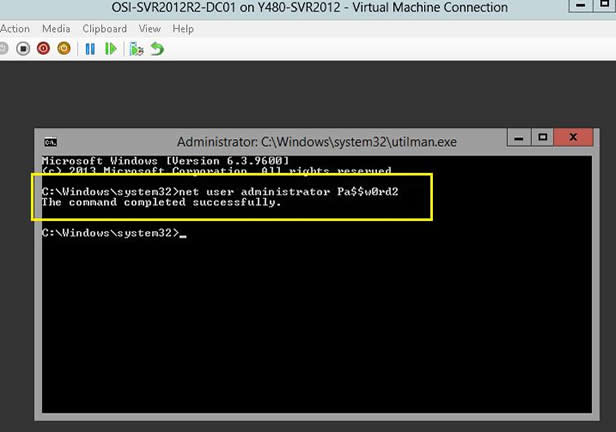
Step 5. Exit your command prompt and then click "Continue". Your Windows server 2016 computer will re boot and go to the logon screen. Here click Windows Key + U to oepn command prompt again, then type command:
net user   --> it will show all user accounts available in OS
net user administrator Pa$$w0rd2   --> it will reset password of account
start to reset Reset Windows Server 2012
Write the actual username and the newly created password in place of USERNAME and PASSWORD option. Pa$$w0rd2 will be set to password for the Administrator user (case sensitive).
Now your job is done! You can enter the locked account with the newly set password.
Note:
1) In case you enter any wrong command mistakenly, it can cause serious damage to the system.
2) If the user is not familiar with the cmd, better not use it .

Tuesday, 20 November 2018

Restore VM from backup in Azure portal

 
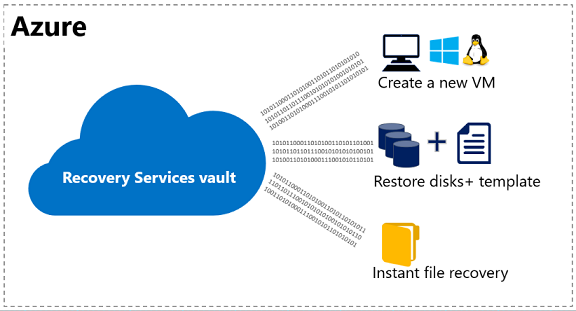
Protect your data by taking snapshots of your data at defined intervals. These snapshots are known as recovery points, and they're stored in Recovery Services vaults. If it's necessary to repair or rebuild a virtual machine (VM), you can restore the VM from any of the saved recovery points. When you restore a recovery point, you can:
  • Create a new VM, which is a point-in-time representation of your backed-up VM.
  • Restore disks, and use the template that comes with the process to customize the restored VM, or do an individual file recovery.
This article explains how to restore a VM to a new VM or restore all backed-up disks. For individual file recovery, see Recover files from an Azure VM backup.
Three ways to restore from VM backup
 Note
Azure has two deployment models for creating and working with resources: Azure Resource Manager and classic. This article provides the information and procedures used to restore deployed VMs by using the Resource Manager model.
Restoring a VM or all disks from VM backup involves two steps:
  • Select a restore point for restore.
  • Select the restore type, create a new VM or restore disks, and specify the required parameters.

Select a restore point for restore

  1. Sign in to the Azure portal.
  2. On the Azure menu, select All services. In the list of services, type Recovery Services or go to STORAGE where the Recovery Service vaults is listed, select it.
    Recovery Services vault
  3. The list of vaults in the subscription is displayed.
    List of Recovery Services vaults
  4. From the list of Recovery Service vaults, select the vault associated with the VM you want to restore. When you select the vault, its dashboard opens.
    Selected Recovery Services vault
  5. In the vault dashboard, on the Backup Items tile, select Azure Virtual Machine.
    Vault dashboard
  6. The Backup Items blade with the list of Azure VMs is opened.
    List of VMs in vault
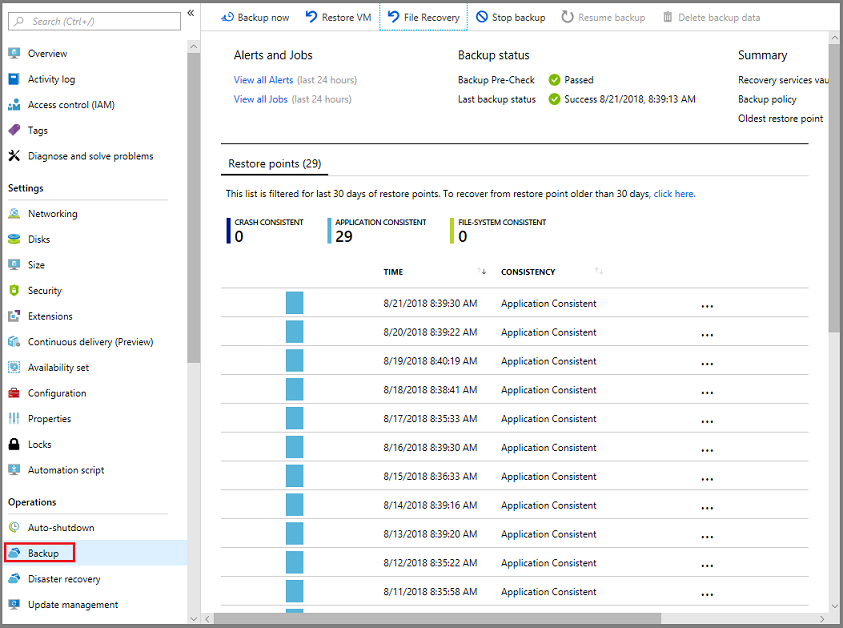
  7. From the list, select a VM to open the dashboard. The VM dashboard opens to the monitoring area, which contains the Recovery points. All VM level operations like Backup nowFile recoveryStop backup can be performed from this blade. Restore can be performed in many ways from this blade. Note that This blade lists only the last 30 days recovery points.
    a) Right click on the recovery point in this blade (less than 30 days) and initiate Restore VM.
    b) To restore recovery points greater than 30 days Click here provided in the blade can be used.
    c) Restore VM in the menu header provides an option to list and filter the VMs in customized dates as preferred.
    Use the Filter to alter the time range of the restore points displayed. By default, restore points of all consistencies are displayed. Modify the All restore points filter to select a specific restore point consistency. For more information about each type of restoration point, see Data consistency.
    Restore point consistency options:
    • Crash consistent restore points
    • Application consistent restore points
    • File-system consistent restore points
    • All restore points
    Restore points
     Note
    Recovery Type represent if it is in customer storage account, in vault or both. Learn more about Instant recovery point.
  8. On the Restore blade, select Restore point.
    Select restore point
    The Restore blade shows that the restore point is set on clicking OK.
  9. If you're not already there, go to the Restore blade. Ensure that a restore point is selected, and select Restore configuration. The Restore configuration blade opens.

Choose a VM restore configuration

After you select the restore point, choose a VM restore configuration. To configure the restored VM, you can use the Azure portal or PowerShell.
  1. If you're not already there, go to the Restore blade. Ensure that a restore point is selected, and select Restore configuration. The Restore configuration blade opens.
  2. This blade currently has two options one being Create New which is default and the other is Replace existing which is in-place restore to replace the disk(s) only retaining the existing configurations and extensions.
 Note
We are working on replacing the entire VM with the disk(s), network settings, configurations and extensions in the next few months.
In the Create New option which restores to the data to new VM or new disk(s), you have two choices:
Restore configuration wizard
  • Create virtual machine
  • Restore disks
Restore configuration wizard
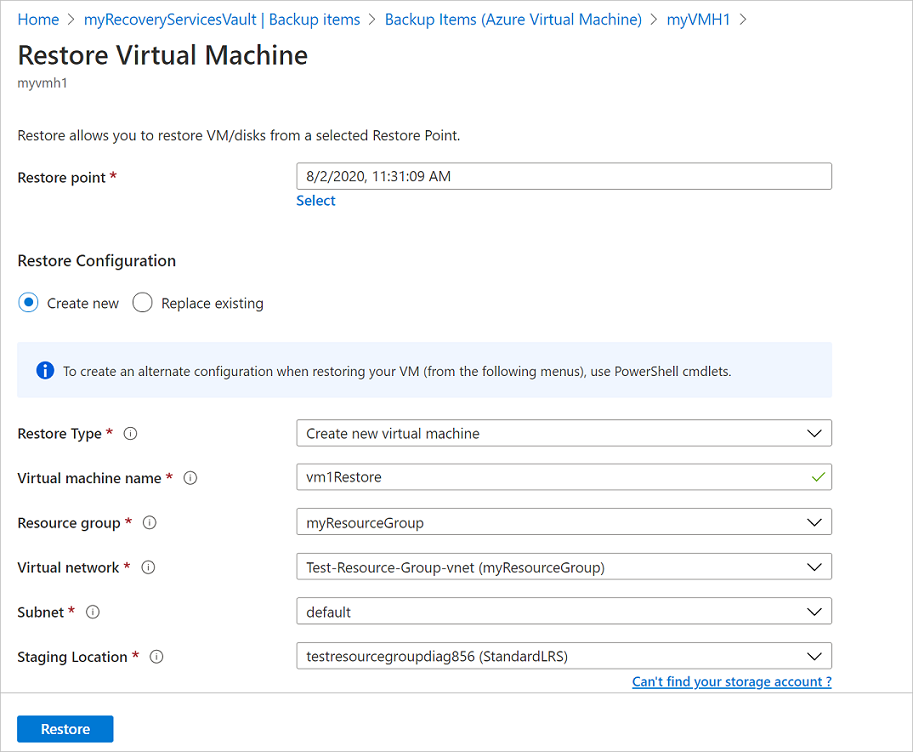
The portal provides a Quick Create option for a restored VM. To customize the VM configuration or the names of the resources created as part of creating a new VM choice, use PowerShell or the portal to restore backed-up disks. Use PowerShell commands to attach them to your choice of VM configuration. Or you can use the template that comes with restored disks to customize the restored VM. For information on how to restore a VM that has multiple NICs or is under a load balancer, see Restore a VM with special network configurations. If your Windows VM uses HUB licensing, restore disks and use PowerShell/Template as specified in this article to create the VM. Make sure that you specify the License Type as "Windows_Server" while you create the VM to avail HUB benefits on the restored VM. Note this can be done later after the creation of VM as well.

Create a new VM from a restore point

  1. On the Restore configuration blade mentioned in the before section, enter or select values for each of the following fields:
    a. Restore Type. Create a virtual machine.
    b. Virtual machine name. Enter the VM name which doesn’t exists in the subscription.
    c. Resource group. Use an existing resource group or create a new one. If you're restoring a classic VM, use this field to specify the name of a new cloud service. If you're creating a new resource group/cloud service, the name must be globally unique. Typically, the cloud service name is associated with a public-facing URL: for example, [cloudservice].cloudapp.net. If you attempt to use a name for the cloud resource group/cloud service already in use, Azure assigns the resource group/cloud service the same name as the VM. Azure displays resource groups/cloud services and VMs not associated with any affinity groups. For more information, see How to migrate from affinity groups to a regional virtual network.
    d. Virtual network. Select the virtual network when you create VM. The field provides all virtual networks associated with the subscription. The resource group of the VM is displayed in parentheses.
    e. Subnet. If the virtual network has subnets, the first subnet is selected by default. If there are additional subnets, select the subnet you want.
    f. Storage Location. Storage accounts are the staging location. This menu lists the storage accounts in the same location as the Recovery Services vault. Storage accounts that are zone redundant aren't supported. If there are no storage accounts with the same location as the Recovery Services vault, you must create one before you start the restore operation. The storage account's replication type is displayed in parentheses.
    Restore configuration wizard
     Note
    • A virtual network is optional for a classic VM and mandatory for Resource Manager-deployed VM.
    • Storage type provided in storage account (premium or standard) in staging location decides the restore disk storage type. We currently don't support a mixed mode of disks when restoring.
  2. On the Restore configuration blade, select OK to finalize the restore configuration. On the Restore blade, select Restore to trigger the restore operation.

Restore backed-up disks

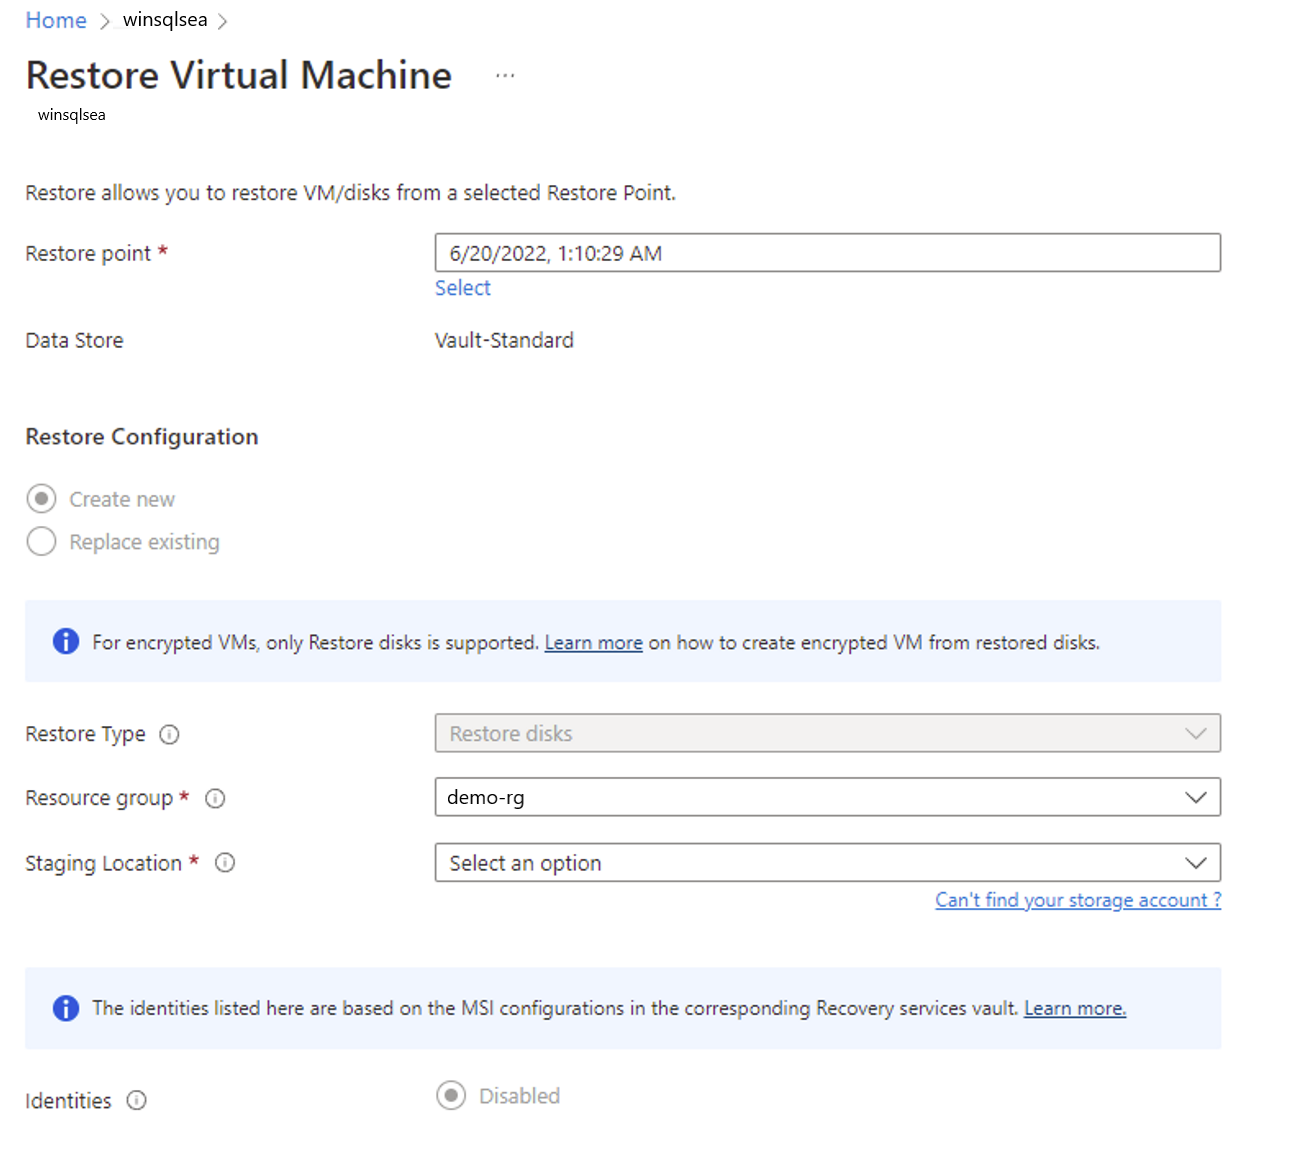
Restore type value Restore disk in Restore configuration blade enables to create a VM with customized configurations. While restoring disks, Storage account to be selected should be in the same location as Recovery services vault. It is mandatory to create a storage account, if there are no storage accounts with the same location as the Recovery Services vault. ZRS Storage accounts are not supported. Replication type of Storage Account is displayed in parentheses.
Post restore operation, use below:
On the Restore configuration blade, select OK to finalize the restore configuration. On the Restoreblade, select Restore to trigger the restore operation.
Recovery configuration completed
In Place Restore is being done through the tab Replace Existing.

Replace existing disks from a restore point

Replace existing option helps to replace existing disks in the current VM with the selected restore point. This operation can be only performed if current VM exists. If it was deleted because of any reasons, this operation cannot be performed; alternatively, we recommend you to do Create newVM or disks to continue with restore operations. During replace existing disk(s) operations, as a precautionary measure, we backup the data before initiating the replace disks operations. If the restore point has disks more/less than the current VM, then the number of disks in the restore point will only reflect in the VM. Replace existing option is currently unsupported for Unmanaged Disks and Encrypted VMs. It is also unsupported for generalized VMs and for VMs created using custom images.
On the Restore Configuration blade, the only input which needs to be selected is Staging Location.
Restore configuration wizard Replace Existing
a. Restore Type. Replace Disk(s) representing that the restore point selected will replace the disk(s) in existing VM.
b. Staging Location. Storage accounts are the staging location for managed disks. This menu lists the storage accounts in the same location as the Recovery Services vault. Storage accounts that are zone redundant aren't supported. If there are no storage accounts with the same location as the Recovery Services vault, you must create one before you start the restore operation. The storage account's replication type is displayed in parentheses.

Track the restore operation

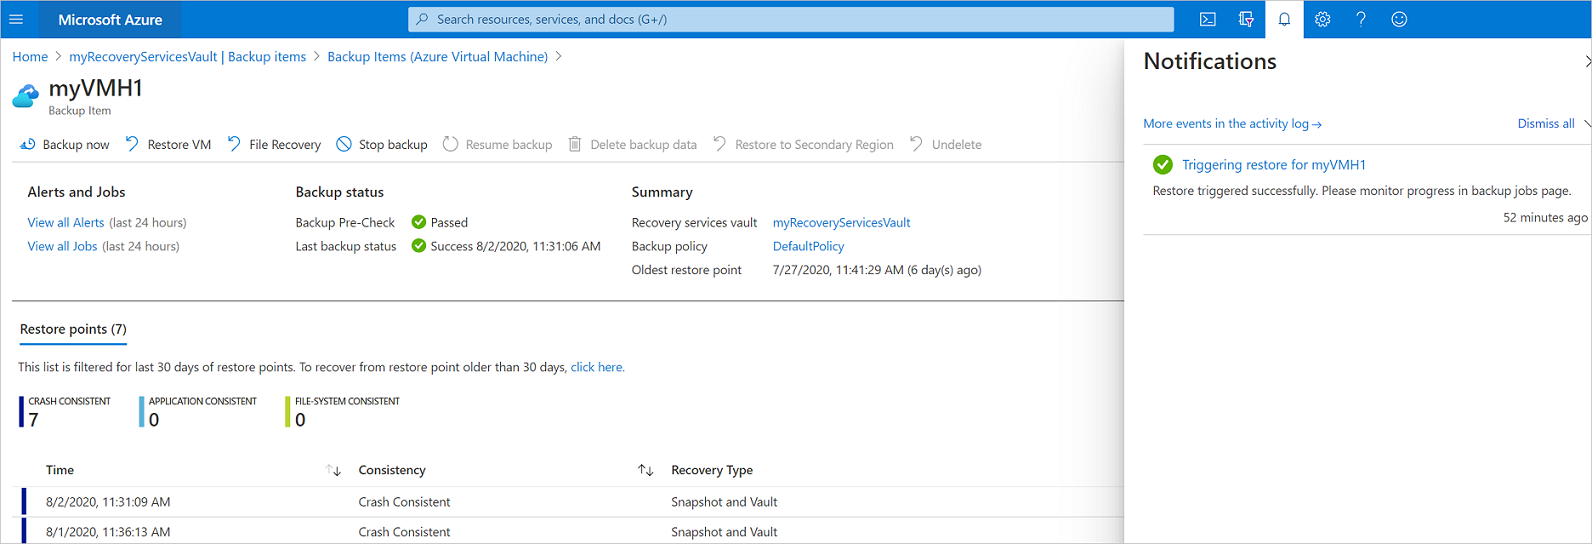
After you trigger the restore operation, the backup service creates a job for tracking the restore operation. The backup service also creates and temporarily displays the notification in the Notifications area of the portal. If you don't see the notification, select the Notifications symbol to view your notifications.
Restore triggered
Click on the hyperlink of the notifications to go to BackupJobs list. All the details of the operations for a given job is available in the BackupJobs lists. You can go to BackupJobs from the vault dashboard by clicking the Backup Jobs tile, select Azure virtual machine to display the jobs associated with the vault.
The Backup jobs blade opens and displays the list of jobs.
List of VMs in a vault

Use templates to customize a restored VM

After the restore disks operation is finished, use the template that was generated as part of the restore operation to create a new VM with a configuration different from the backup configuration. You also can use it to customize names of resources that were created during the process of creating a new VM from a restore point.
Restore job drill-down
To get the template that was generated as part of the restore disks option:
  1. Go to the Restore Job Details corresponding to the job.
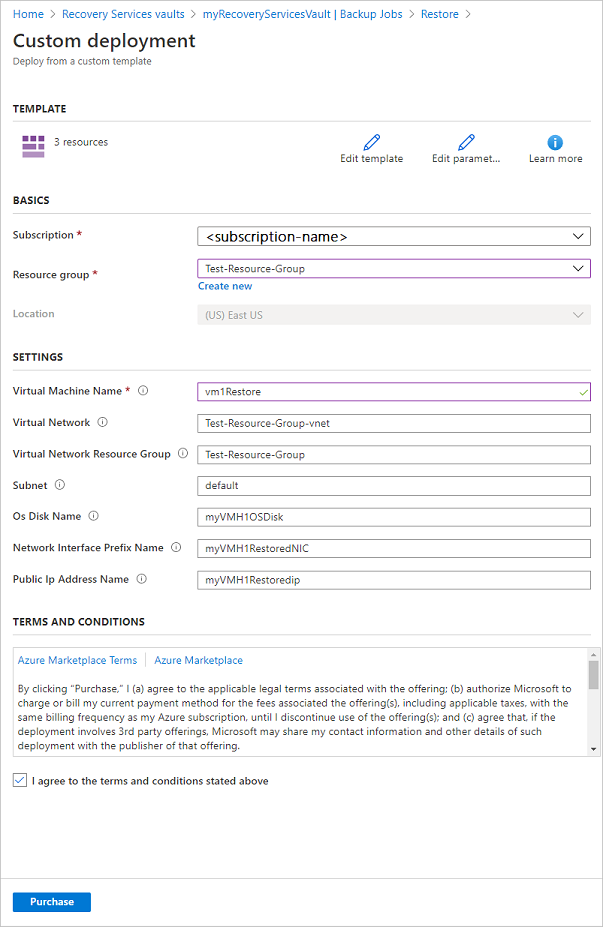
  2. On the Restore Job Details screen, select Deploy Template to initiate template deployment.
  3. On the Deploy template blade for custom deployment, use template deployment to edit and deploy the template or append more customizations by authoring a template before you deploy.
    Load template deployment
  4. After you enter the required values, accept the Terms and Conditions and select Purchase.
    Submit template deployment

Post-restore steps

  • If you use a cloud-init-based Linux distribution, such as Ubuntu, for security reasons, the password is blocked post restore. Use the VMAccess extension on the restored VM to reset the password. We recommend using SSH keys on these distributions to avoid resetting the password post restore.
  • Extensions present during the backup configuration are installed, but they won't be enabled. If you see an issue, reinstall the extensions.
  • If the backed-up VM has static IP post restore, the restored VM has a dynamic IP to avoid conflict when you create a restored VM. Learn more about how you can add a static IP to a restored VM.
  • A restored VM doesn't have an availability value set. We recommend using the restore disks option to add an availability set when you create a VM from PowerShell or templates by using restored disks.

Backup for restored VMs

If you restored a VM to the same resource group with the same name as the originally backed-up VM, backup continues on the VM post restore. If you restored the VM to a different resource group or you specified a different name for the restored VM, the VM is treated as if it's a new VM. You need to set up backup for the restored VM.

Restore a VM during an Azure datacenter disaster

Azure Backup allows restoring backed-up VMs to the paired datacenter in case the primary datacenter where VMs are running experiences a disaster and you configured the backup vault to be geo-redundant. During such scenarios, select a storage account, which is present in a paired datacenter. The rest of the restore process remains the same. Backup uses the compute service from the paired geo to create the restored VM. For more information, see Azure datacenter resiliency.

Restore domain controller VMs

Backup of domain controller (DC) VMs is a supported scenario with Backup. However, you must be careful during the restore process. The correct restore process depends on the structure of the domain. In the simplest case, you have a single DC in a single domain. More commonly for production loads, you have a single domain with multiple DCs, perhaps with some DCs on-premises. Finally, you might have a forest with multiple domains.
From an Active Directory perspective, the Azure VM is like any other VM on a modern supported hypervisor. The major difference with on-premises hypervisors is that there's no VM console available in Azure. A console is required for certain scenarios, such as recovering by using a bare-metal recovery (BMR)-type backup. However, VM restore from the backup vault is a full replacement for BMR. Directory Services Restore Mode (DSRM) is also available, so all Active Directory recovery scenarios are viable. For more information, see Backup and restore considerations for virtualized domain controllers and Planning for Active Directory forest recovery.

Single DC in a single domain

The VM can be restored (like any other VM) from the Azure portal or by using PowerShell.

Multiple DCs in a single domain

When other DCs of the same domain can be reached over the network, the DC can be restored like any VM. If it's the last remaining DC in the domain, or a recovery in an isolated network is performed, a forest recovery procedure must be followed.

Multiple domains in one forest

When other DCs of the same domain can be reached over the network, the DC can be restored like any VM. In all other cases, we recommend a forest recovery.

Restore VMs with special network configurations

It's possible to back up and restore VMs with the following special network configurations. However, these configurations require some special consideration while going through the restore process:
  • VMs under load balancers (internal and external)
  • VMs with multiple reserved IPs
  • VMs with multiple NICs
 Important
When you create the special network configuration for VMs, you must use PowerShell to create VMs from the restored disks.
To fully re-create the VMs after restoring to disk, follow these steps:
  1. Restore the disks from a Recovery Services vault by using PowerShell.
  2. Create the VM configuration required for load balancer/multiple NIC/multiple reserved IP by using the PowerShell cmdlets. Use it to create the VM with the configuration you want:
    a. Create a VM in the cloud service with an internal load balancer.
    b. Create a VM to connect to an internet-facing load balancer.
    c. Create a VM with multiple NICs.
    d. Create a VM with multiple reserved IPs.

Recover files & folders from Azure virtual machine old backup

 
Azure Backup provides the capability to restore Azure virtual machines (VMs) and disks from Azure VM backups, also known as recovery points. This article explains how to recover files and folders from an Azure VM backup. Restoring files and folders is available only for Azure VMs deployed using the Resource Manager model and protected to a Recovery services vault.
 Note
This feature is available for Azure VMs deployed using the Resource Manager model and protected to a Recovery Services vault. File recovery from an encrypted VM backup is not supported.

Mount the volume and copy files

To restore files or folders from the recovery point, go to the virtual machine and choose the desired recovery point.
  1. Sign in to the Azure portal and in the left pane, click Virtual machines. From the list of virtual machines, select the virtual machine to open that virtual machine's dashboard.
  2. In the virtual machine's menu, click Backup to open the Backup dashboard.
    Open Recovery Services vault backup item
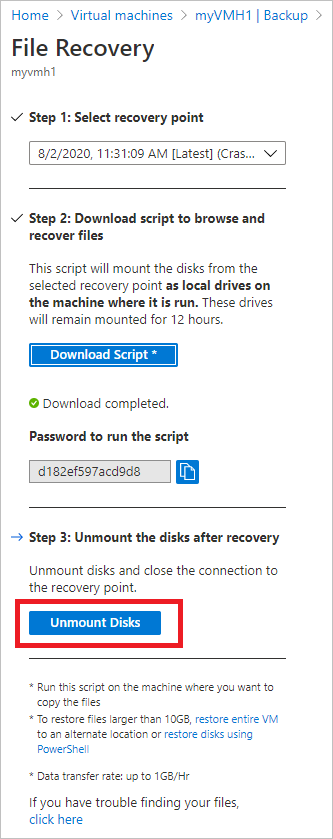
  3. In the Backup dashboard menu, click File Recovery.
    File recovery button
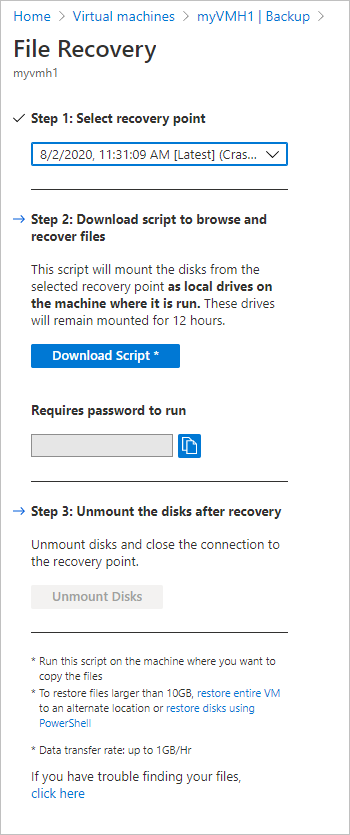
    The File Recovery menu opens.
    File recovery menu
  4. From the Select recovery point drop-down menu, select the recovery point that holds the files you want. By default, the latest recovery point is already selected.
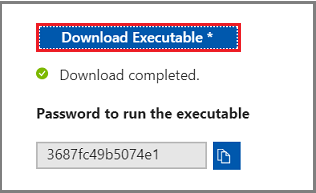
  5. To download the software used to copy files from the recovery point, click Download Executable (for Windows Azure VM) or Download Script (for Linux Azure VM, a python script is generated).
    Generated password
    Azure downloads the executable or script to the local computer.
    download message for the executable or script
    To run the executable or script as an administrator, it is suggested you save the download to your computer.
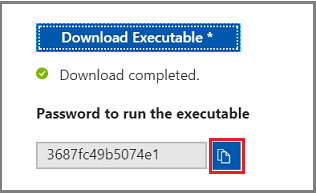
  6. The executable or script is password protected and requires a password. In the File Recoverymenu, click the copy button to load the password into memory.
    Generated password
  7. From the download location (usually the Downloads folder), right-click the executable or script and run it with Administrator credentials. When prompted, type the password or paste the password from memory, and press Enter. Once the valid password is entered, the script connects to the recovery point.
    File recovery menu
    If you run the script on a computer with restricted access, ensure there is access to:
    • download.microsoft.com
    • Recovery Service URLs (geo-name refers to the region where the recovery service vault resides)
    • outbound port 3260
      For Linux, the script requires 'open-iscsi' and 'lshw' components to connect to the recovery point. If the components do not exist on the computer where the script is run, the script asks for permission to install the components. Provide consent to install the necessary components.
      The access to download.microsoft.com is required to download components used to build a secure channel between the machine where the script is run and the data in the recovery point.
      You can run the script on any machine that has the same (or compatible) operating system as the backed-up VM. See the Compatible OS table for compatible operating systems. If the protected Azure virtual machine uses Windows Storage Spaces (for Windows Azure VMs) or LVM/RAID Arrays (for Linux VMs), you can't run the executable or script on the same virtual machine. Instead, run the executable or script on any other machine with a compatible operating system.

Identifying Volumes

For Windows

When you run the executable, the operating system mounts the new volumes and assigns drive letters. You can use Windows Explorer or File Explorer to browse those drives. The drive letters assigned to the volumes may not be the same letters as the original virtual machine, however, the volume name is preserved. For example, if the volume on the original virtual machine was “Data Disk (E:\)”, that volume can be attached on the local computer as “Data Disk ('Any letter':\). Browse through all volumes mentioned in the script output until you find your files/folder.
File recovery menu

For Linux

In Linux, the volumes of the recovery point are mounted to the folder where the script is run. The attached disks, volumes, and the corresponding mount paths are shown accordingly. These mount paths are visible to users having root level access. Browse through the volumes mentioned in the script output.
Linux File recovery menu

Closing the connection

After identifying the files and copying them to a local storage location, remove (or unmount) the additional drives. To unmount the drives, on the File Recovery menu in the Azure portal, click Unmount Disks.
Unmount disks
Once the disks have been unmounted, you receive a message. It may take a few minutes for the connection to refresh so that you can remove the disks.
In Linux, after the connection to the recovery point is severed, the OS doesn't remove the corresponding mount paths automatically. The mount paths exist as "orphan" volumes and they are visible but throw an error when you access/write the files. They can be manually removed. The script, when run, identifies any such volumes existing from any previous recovery points and cleans them up upon consent.

Special configurations

Dynamic Disks

If the protected Azure VM has volumes with one or both of the following characteristics, you can't run the executable script on the same VM.
- Volumes that span multiple disks (spanned and striped volumes)
- Fault-tolerant volumes (mirrored and RAID-5 volumes) on dynamic disks
Instead, run the executable script on any other computer with a compatible operating system.

Windows Storage Spaces

Windows Storage Spaces is a Windows technology that enables you to virtualize storage. With Windows Storage Spaces you can group industry-standard disks into storage pools. Then you use the available space in those storage pools to create virtual disks, called storage spaces.
If the protected Azure VM uses Windows Storage Spaces, you can't run the executable script on the same VM. Instead, run the executable script on any other machine with a compatible operating system.

LVM/RAID Arrays

In Linux, Logical volume manager (LVM) and/or software RAID Arrays are used to manage logical volumes over multiple disks. If the protected Linux VM uses LVM and/or RAID Arrays, you can't run the script on the same VM. Instead run the script on any other machine with a compatible OS and which supports the file system of the protected VM.
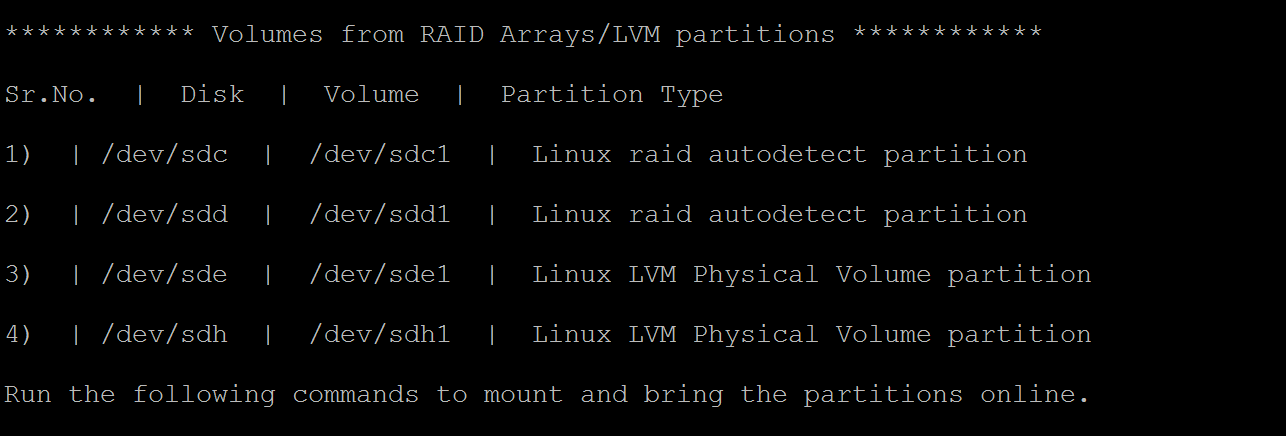
The following script output displays the LVM and/or RAID Arrays disks and the volumes with the partition type.
Linux LVM Output menu
To bring these partitions online, run the commands in the following sections.

For LVM Partitions

To list the volume group names under a physical volume.
bash
#!/bin/bash
$ pvs <volume name as shown above in the script output>
To list all logical volumes, names, and their paths in a volume group.
bash
#!/bin/bash
$ lvdisplay <volume-group-name from the pvs command’s results>
To mount the logical volumes to the path of your choice.
bash
#!/bin/bash
$ mount <LV path> </mountpath>

For RAID Arrays

The following command displays details about all raid disks.
bash
#!/bin/bash
$ mdadm –detail –scan
The relevant RAID disk is displayed as /dev/mdm/<RAID array name in the protected VM>
Use the mount command if the RAID disk has physical volumes.
bash
#!/bin/bash
$ mount [RAID Disk Path] [/mountpath]
If the RAID disk has another LVM configured in it, then use the preceding procedure for LVM partitions but use the volume name in place of the RAID Disk name

System requirements

For Windows OS

The following table shows the compatibility between server and computer operating systems. When recovering files, you can't restore files to a previous or future operating system version. For example, you can't restore a file from a Windows Server 2016 VM to Windows Server 2012 or a Windows 8 computer. You can restore files from a VM to the same server operating system, or to the compatible client operating system.
Server OSCompatible client OS
Windows Server 2016Windows 10
Windows Server 2012 R2Windows 8.1
Windows Server 2012Windows 8
Windows Server 2008 R2Windows 7

For Linux OS

In Linux, the OS of the computer used to restore files must support the file system of the protected virtual machine. When selecting a computer to run the script, ensure the computer has a compatible OS, and uses one of the versions identified in the following table:
Linux OSVersions
Ubuntu12.04 and above
CentOS6.5 and above
RHEL6.7 and above
Debian7 and above
Oracle Linux6.4 and above
SLES12 and above
openSUSE42.2 and above
The script also requires Python and bash components to execute and connect securely to the recovery point.
ComponentVersion
bash4 and above
python2.6.6 and above
TLS1.2 should be supported

Troubleshooting

If you have problems while recovering files from the virtual machines, check the following table for additional information.
Error Message / ScenarioProbable CauseRecommended action
Exe output: Exception connecting to the targetScript is not able to access the recovery pointCheck whether the machine fulfills the previous access requirements.
Exe output: The target has already been logged in via an iSCSI session.The script was already executed on the same machine and the drives have been attachedThe volumes of the recovery point have already been attached. They may NOT be mounted with the same drive letters of the original VM. Browse through all the available volumes in the file explorer for your file
Exe output: This script is invalid because the disks have been dismounted via portal/exceeded the 12-hr limit. Download a new script from the portal.The disks have been dismounted from the portal or the 12-hr limit exceededThis particular exe is now invalid and can’t be run. If you want to access the files of that recovery point-in-time, visit the portal for a new exe
On the machine where the exe is run: The new volumes are not dismounted after the dismount button is clickedThe iSCSI initiator on the machine is not responding/refreshing its connection to the target and maintaining the cache.After clicking Dismount, wait a few minutes. If the new volumes are not dismounted, browse through all volumes. Browsing all volumes forces the initiator to refresh the connection, and the volume is dismounted with an error message that the disk is not available.
Exe output: Script is run successfully but “New volumes attached” is not displayed on the script outputThis is a transient errorThe volumes would have been already attached. Open Explorer to browse. If you are using the same machine for running scripts every time, consider restarting the machine and the list should be displayed in the subsequent exe runs.
Linux specific: Not able to view the desired volumesThe OS of the machine where the script is run may not recognize the underlying filesystem of the protected VMCheck whether the recovery point is crash consistent or file-consistent. If file consistent, run the script on another machine whose OS recognizes the protected VM's filesystem
Windows specific: Not able to view the desired volumesThe disks may have been attached but the volumes were not configuredFrom the disk management screen, identify the additional disks related to the recovery point. If any of these disks are in offline state try making them online by right-clicking on the disk and click 'Online'