Showing posts with label group policies. Show all posts

Sunday, 16 September 2018

Group Policy Repair : Restore corrupted domain & domain controllers group policy


Syntax

DCGPOFix [/ignoreschema] [/target: {Domain | DC | Both}] [/?]

Parameters

ParameterDescription
/ignoreschemaIgnores the version of the Active Directory® schema mc
when you run this command. Otherwise, the command only works on the same schema version as the Windows version in which the command was shipped.
/target {DomainDC
/?Displays Help at the command prompt.

Remarks

  • The dcgpofix command is available in Windows Server 2008 R2 and Windows Server 2008, except on Server Core installations.
  • Although the Group Policy Management Console (GPMC) is distributed with Windows Server 2008 R2 and Windows Server 2008, you must install Group Policy Management as a feature through Server Manager.

Examples

Restore the Default Domain Policy GPO to its original state. You will lose any changes that you have made to this GPO. As a best practice, you should configure the Default Domain Policy GPO only to manage the default Account Policies settings, Password Policy, Account Lockout Policy, and Kerberos Policy. In this example, you ignore the version of the Active Directory schema so that the dcgpofix command is not limited to same schema as the Windows version in which the command was shipped.
dcgpofix /ignoreschema /target:Domain
Restore the Default Domain Controllers Policy GPO to its original state. You will lose any changes that you have made to this GPO. As a best practice, you should configure the Default Domain Controllers Policy GPO only to set user rights and audit policies. In this example, you ignore the version of the Active Directory schema so that the dcgpofixcommand is not limited to same schema as the Windows version in which the command was shipped.
dcgpofix /ignoreschema /target:DC
Monday, 24 October 2016

How to rename Administrator account using GPO in Windows Server 2012


How to rename Administrator account using Group Policy in Windows Server 2012 R2

In this post, we’ll learn the steps to rename Administrator account using GPO in Windows Server 2012 R2. In most of the Organizations, it is recommended to rename the Administrator account. This kind of policy is primarily used in the Organizations to enhance the security. In the old posts, we have already talked about Group Policy Management Preferences, inheritance, etc. Moreover, we have already talked about the Policies to disable Run command,  deploy Software and restrict Software.
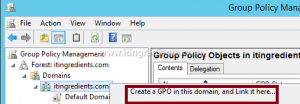
Step 1. To rename Administrator account, open Group Policy Management console.
Right-click on the domain name i.e. itingredients.com in this example and then click on “create a GPO in this domain, and link it here” to create a new GPO.
How to change Domain Administrator Name in Windows Server 2012 R2 (5)
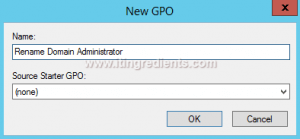
Step 2. In “New GPO” console enter the name of a GPO and click on OK.
We have named the GPO “Rename Domain Administrator” in this example.
You can define any other name as per your preference.
How to change Domain Administrator Name in Windows Server 2012 R2 (3)
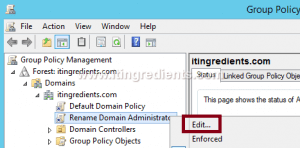
Step 3. Right click on the GPO which we have created (Rename Domain Administrator) and click on Edit. 
A new GPO is like a blank template and we have to edit the GPO settings to define and enable the policy.
How to change Domain Administrator Name in Windows Server 2012 R2 (1)
Step 4.  “Removing All Programs list from the Start Menu” is a User policy.
On Group Policy Management Editor under computer Configuration expand Policies and then expand Windows Settings.
Under the Windows Settings expand Security settings and then click on Local Policies.
Under Local Policies click on Security Options and then right click on “Accounts Rename Administrator account” after it clicks on Properties.
How to change Domain Administrator Name in Windows Server 2012 R2 (8)
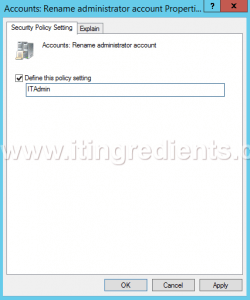
Step 5. On Accounts:Rename administrator account Properties console, select Define the policy settings and we have named ITAdmin.
You can define any other name as per your preference. Click on OK.
How to change Domain Administrator Name in Windows Server 2012 R2 (9)
Step 6. Now, open the command prompt and run command gpupdate /force to update the policy. However, being a Computer Group Policy it might require a restart to apply the Group Policies.
How to change Domain Administrator Name in Windows Server 2012 R2 (10)
Step 7. Name of the Domain Administrator is changed successfully.
Hope you understood the steps to rename Administrator account using GPO in Windows Server 2012 R2. Please feel free to share your experience, leave your comments and suggestions in the comment section.

How to remove Shutdown from Start Menu via GPO


How to remove Shutdown from Start Menu via GPO in Windows Server 2012 R2

In this post, we will learn the steps to remove shutdown from start menu. In addition to that we’ll also remove the options like restart, sleep and hibernate options from the start menu on all client computers. Many organizations want to restrict their users from performing the commands like shutdown, restart, sleep and hibernate on computers. This can easily be achieved by using group policy objects. So, the only option which a user can perform is Log off once polices are deployed.
We have assumed a scenario in which, an organization wants to disable the power options for the users in a Sales department.
Pre-requisites:
On the Domain Controllercreate an OU with the name Sales.
Create some users in the Sales OU, we’ll remove run from start menu for all the users that are in Sales OU.

Steps to remove Shutdown from Start Menu via GPO are as follows:

1. On Domain Controller, in Active Directory Users and Computers, we have created an Organizational Unit “Sales” and add some users in it.

Disable Shutdown using GP (1)
How to remove shutdown from start menu via GPO

2. On Group Policy Management Console (GPMC), right click on OU “Sales” and click on “Create a GPO in this domain, and Link it here“. The newly created Group Policy Object is a blank template, we need to enable the settings in the blank template.
Disable Shutdown using GP (2)
3. On New GPO console, enter the name of the group policy object and click on OK. In this practical, “Disable Shutdown” is our GPO name. I’d suggest to give the name that defines the policy you are planning to implement.
Disable Shutdown using GP (3)
4.  To remove shutdown from start menu via GPO, right click on the GPO “Disable Shutdown” and then click on “Edit” to modify the GPO settings.
Disable Shutdown using GP (4)
5. To enable the policy for disabling the option of shutdown, on GPME console, under User Configurationexpand Policies then expand Administrative Templates. Click on Start Menu and Taskbar. Search “Remove and prevent access to the Shut Down, Restart” policy and double click on it to open the policy settings.
Disable Shutdown using GP (5)
6. On “Remove and prevent access to the Shut Down, Restart” console. By default setting is set to “Not Configured, click on Enabled to enable the policy. Click on Apply and Ok. This policy helps in restricting the users to perform Shut Down, Restart, Sleep and Hibernate.
Disable Shutdown using GP (6)
7. Log in to any client computer with any user account added in the OU “Sales” and click on Start and then power options. We can only see the options of Log off, Switch user and Lock. It means that the policy is successfully deployed.
Disable Shutdown using GP (7)
8. If any user press Alt+F4 for power options, they would get an error message “This operation has been cancelled due to restrictions in effect on this computer. Please contact your system administrator“. This message confirm that our group policy to remove run from start menu is deployed successfully.
Disable Shutdown using GP (8)
Please share your experience in the comments section, if you have deployed the policy or remove shutdown from start menu or planning to do the same in near future.