How to rename Administrator account using Group Policy in Windows Server 2012 R2
In this post, we’ll learn the steps to rename Administrator account using GPO in Windows Server 2012 R2. In most of the Organizations, it is recommended to rename the Administrator account. This kind of policy is primarily used in the Organizations to enhance the security. In the old posts, we have already talked about Group Policy Management Preferences, inheritance, etc. Moreover, we have already talked about the Policies to disable Run command, deploy Software and restrict Software.
Step 1. To rename Administrator account, open Group Policy Management console.
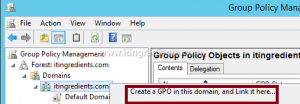
Right-click on the domain name i.e. itingredients.com in this example and then click on “create a GPO in this domain, and link it here” to create a new GPO.
Right-click on the domain name i.e. itingredients.com in this example and then click on “create a GPO in this domain, and link it here” to create a new GPO.
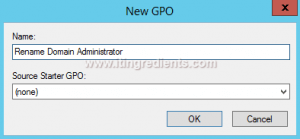
Step 2. In “New GPO” console enter the name of a GPO and click on OK.
We have named the GPO “Rename Domain Administrator” in this example.
You can define any other name as per your preference.
We have named the GPO “Rename Domain Administrator” in this example.
You can define any other name as per your preference.
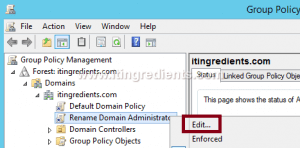
Step 3. Right click on the GPO which we have created (Rename Domain Administrator) and click on Edit.
A new GPO is like a blank template and we have to edit the GPO settings to define and enable the policy.
A new GPO is like a blank template and we have to edit the GPO settings to define and enable the policy.
Step 4. “Removing All Programs list from the Start Menu” is a User policy.
On Group Policy Management Editor under computer Configuration expand Policies and then expand Windows Settings.
Under the Windows Settings expand Security settings and then click on Local Policies.
Under Local Policies click on Security Options and then right click on “Accounts Rename Administrator account” after it clicks on Properties.
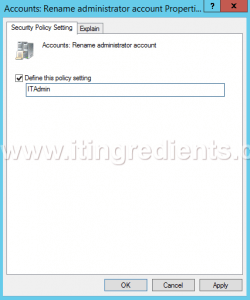
Step 5. On Accounts:Rename administrator account Properties console, select Define the policy settings and we have named ITAdmin.
You can define any other name as per your preference. Click on OK.
You can define any other name as per your preference. Click on OK.

Step 6. Now, open the command prompt and run command gpupdate /force to update the policy. However, being a Computer Group Policy it might require a restart to apply the Group Policies.

Step 7. Name of the Domain Administrator is changed successfully.
Hope you understood the steps to rename Administrator account using GPO in Windows Server 2012 R2. Please feel free to share your experience, leave your comments and suggestions in the comment section.


No comments:
Write comments